What is an Affinity Diagram?
→ An affinity diagram is a very useful Management and Business tool that is used to organize ideas and data for analysis.
→ The Affinity Diagram is a tool that collects large amounts of data (ideas, opinions, issues) and organizes them into groupings based on their natural or common relationships.
→ The ideas are generated by a group of team with the help of brainstorming is also called as Affinity Process.
→ It is one of the most important tools of New 7 QC Tools or we can say that Seven Management and Planning Tools.
→ However, the term affinity diagram was originated by a Japanese anthropologist Jiro Kawakita in the 1960s.
→ That's why sometimes, it is referred to as the KJ Method.
→ The tool is commonly used within project management for any kind of project either Problem Solving or any Improvement related.
→ For a better understanding, we can take an example, like bananas, apples, and oranges would be grouped as fruits, while tomato, potato, cabbage, broccoli, and carrots would be grouped as vegetables, likewise.
→ The affinity_diagram may be used to create a Cause and Effect Diagram.
Different Names of an Affinity Diagram Tool
- Affinity_Chart
- Affinity_Mapping
- K-J Method
- Thematic Analysis
Why should we use the Affinity process?
→ The Affinity_Process is a good way to get people to work on a creative level to address difficult issues.
→ It may be used in situations that are unknown or unexplored by a team.
→ Also, it may be used in a confusing or disorganized situation.
→ Mainly it is used when people with various experiences form a new team, or when members have incomplete knowledge of the area of analysis.
When to use the Affinity Diagram Tool
→ We can use this tool when you want to analyze large volumes of unorganized data.
→ For example, a process owner who is identifying customers and their needs might compile a very large list of unsorted or and unorganized data.
→ In this kind of case, creating an Affinity_Diagram might be helpful for organizing the data into groups.
→ It helps us to identify new patterns of thinking.
→ When we are analyzing verbal data, such as survey results.
→ When collecting and organizing large data sets.
→ If we need to develop relationships among the large numbers of ideas or data sets at that time also we can use this process.
When not to use the Affinity Diagram Tool
→ As a thumb rule, we should not use the Affinity_Process if we have less than 15 items or information for analysis.
→ For lesser_ideas or items of information, we can combine the_ideas and use one of the Decision-Making Tools to identify the highest priority items.
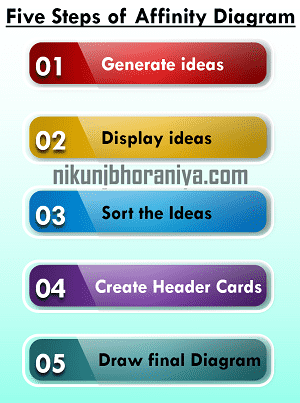
How to make an Affinity Diagram?
- Generate or Create ideas
- Display the Ideas
- Sort Ideas into Related Groups
- Create Header Cards
- Draw the finished Affinity Diagram
Step_01 - Generate ideas
→ In the very first stage of this activity, we need to generate_ideas by using the Brainstorming tool.
→ If we not down all ideas then the further process will become easier.
→ We need to not all_ideas during the brainstorming.
Step_02 - Display ideas
→ After generating the_ideas note down in sticky note or in cards and display on a chart, wall, table, or board in random order.
Step_03 - Sort the Ideas into Related Groups
→ Now in the 3rd step, we need to sort ideas as per the relevant group.
→ We can start this activity by looking for two ideas that seem related in some way.
→ Place_ideas together in a column based on their natural or common relationship.
→ Look for other ideas that are related to each other and establish new groups.
→ Repeat this process until the team has placed all of the ideas in groups.
NOTE:
→ Ideally, all of the the_ideas can be sorted into related groups.
→ If there are some ideas that don’t fit any of the groups then don’t force them into groupings where they don’t really belong.
→ Let them stand alone under their own headers.
Step_04 - Create Header Cards for the Groups
→ A header is an idea that includes and captures the essential relationships between the_ideas contained in a group of cards.
→ This idea is written on a single card or post-it.
→ The meaning of the header_card must be very clear that anybody can easily understand the meaning of the groups.
→ Also, the header can pass a clear meaning to the team and all other people also who are not in the team.
→ We can change the wording of the header_card during the group discussion and deciding the header card name. Also, ensure that it should be agreed by all team members.
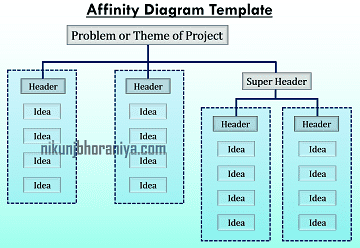
→ Also if we can find a relationship between two or more groups or headers then we should rearrange them under a "Super Header." column.
→ We need to apply the same rule for Super Header as we have applied in the regular header activity.
Step_05 - Draw the finished Affinity Diagram
→ The final step is to create the finished_diagram.
→ In this step, we need to write a problem statement at the top of the_diagram.
→ Place header and super header cards above the groups of ideas.
→ We need to review and clarify the final groupings of ideas.
→ Make proper documents for this whole process for further reference.
→ We can see the typical template of an affinity diagram in the below picture.
Example and Case Study of the Affinity Diagram
→ After defining the problem the further step is to brainstorm to obtain around two to three dozen responses.
→ Each response is clearly written on sticky note paper.
→ The next step is to move the notes around until they fall into five to 10 natural groups.
→ If a note can fall under two different categories at that time we can make one duplicate note and place it into both categories.
→ The next step is to find a name for each group or we can say the header of the group.
→ The last step is to draw lines containing all the notes in a group with the group name.
→ The step-wise example of an affinity_diagram is shown in the below figure.
➨ Problem: What are some of the ways to reduce cycle time for process A?
Step 1: Generate or Create ideas
→ In the very first stage of this activity, we need to generate_ideas by using the Brainstorming process.
→ After finishing the brainstorming we have generated the below ideas for the Problem: What are some of the ways to reduce cycle time for process A?
→ Increase M/C Speed, Reduce Spare Consumption, Simplify M/C Operation, Add Conveyor, Develop Backup Vendor, Add New Control, Reduce setup time, Deploy More People, Improve Vendor Delivery Time, Change Grade of Lubricant, Provide Training, Support During Setup, Vehicle Loading Time Decrease, Improve Communication with Vendor, Vehicle Loading Time Decrease, Improve Communication with Vendor, Reduce paperwork, Add Overhead Crane, Improve Vendor Quality, Improve MTTR, and MTBF.
Step 2 - Display ideas
→ After generating the_ideas note them down on sticky notes or on cards and display them on a chart, wall, table, or board in random order.
→ For your better understanding refer to the below picture.
Step 3 - Sort the Ideas into Related Groups
→ Now in the 3rd step, we need to sort_ideas as per the relevant group.
→ We can start this activity by looking for two ideas that seem related in some way.
→ Place them together in a column.
→ For better understanding refer to the below picture.
Step 4 - Create Header Cards for the Groups
→ A header is an idea that includes and captures the essential relationships between the_ideas contained in a group of cards.
→ We can see the header for the relevant activity in the below picture.
→ Now Based on the group discussion we can create the below headers for the above-mentioned groups.
Step 5 - Draw the finished Affinity Diagram
→ In the finished diagram we need to write the problem statement at the top of the diagram then Super Header is available, Header, and activities as per group.
→ Refer to the below picture for the complete diagram.
Benefits of the Affinity Diagram Tool and Process
→ The affinity diagram process is simple and cost-effective.
→ The thinking ability of members will increase.
→ Innovative ideas will come during brainstorming.
→ This is a transparent and systematic tool.
→ This is a very simple and effective tool that everyone can use easily.


Nice and informative
ReplyDeleteThanks for your kind words
DeleteYour blog is a captivating source of information, beautifully crafted with insightful content. Its engaging style effortlessly conveys complex topics, making it accessible to readers of all backgrounds. The visual appeal and user-friendly layout enhance the overall experience, making it a valuable resource in its niche.
ReplyDeleteThanks for your kind words and appriciation and happy learning
DeletePost a Comment